The Ultimate Guide to Reconstituting TB-500
In the exacting world of peptide research, the integrity of your data is only as good as the integrity of your solution. TB-500 (Thymosin Beta-4) arrives in your laboratory as a lyophilised (freeze-dried) powder. This white, caked substance is stable, durable, and relatively inert. However, it is biologically useless in this state. For the researcher, the critical transition point—the moment where chemistry meets biology—is the process of reconstituting TB-500 into a liquid solution.
This process is often underestimated. New researchers may view it as a simple task of “adding water.” This is a dangerous oversimplification. Reconstitution requires a specific set of aseptic techniques, a clear understanding of peptide fragility, and, most importantly, flawless arithmetic. A miscalculation in solvent volume or a heavy-handed mixing technique can alter the concentration or denature the peptide, ruining the accuracy of your entire longitudinal study before it has even begun.
This technical guide outlines the equipment, the physics, the math, and the aseptic protocols required to master the art of reconstitution.
2. Equipment Needed: The Toolbox of Precision
Before breaking the seal on a pen peptide, a professional researcher gathers all necessary materials. Attempting to find a syringe halfway through the process increases the risk of contamination.
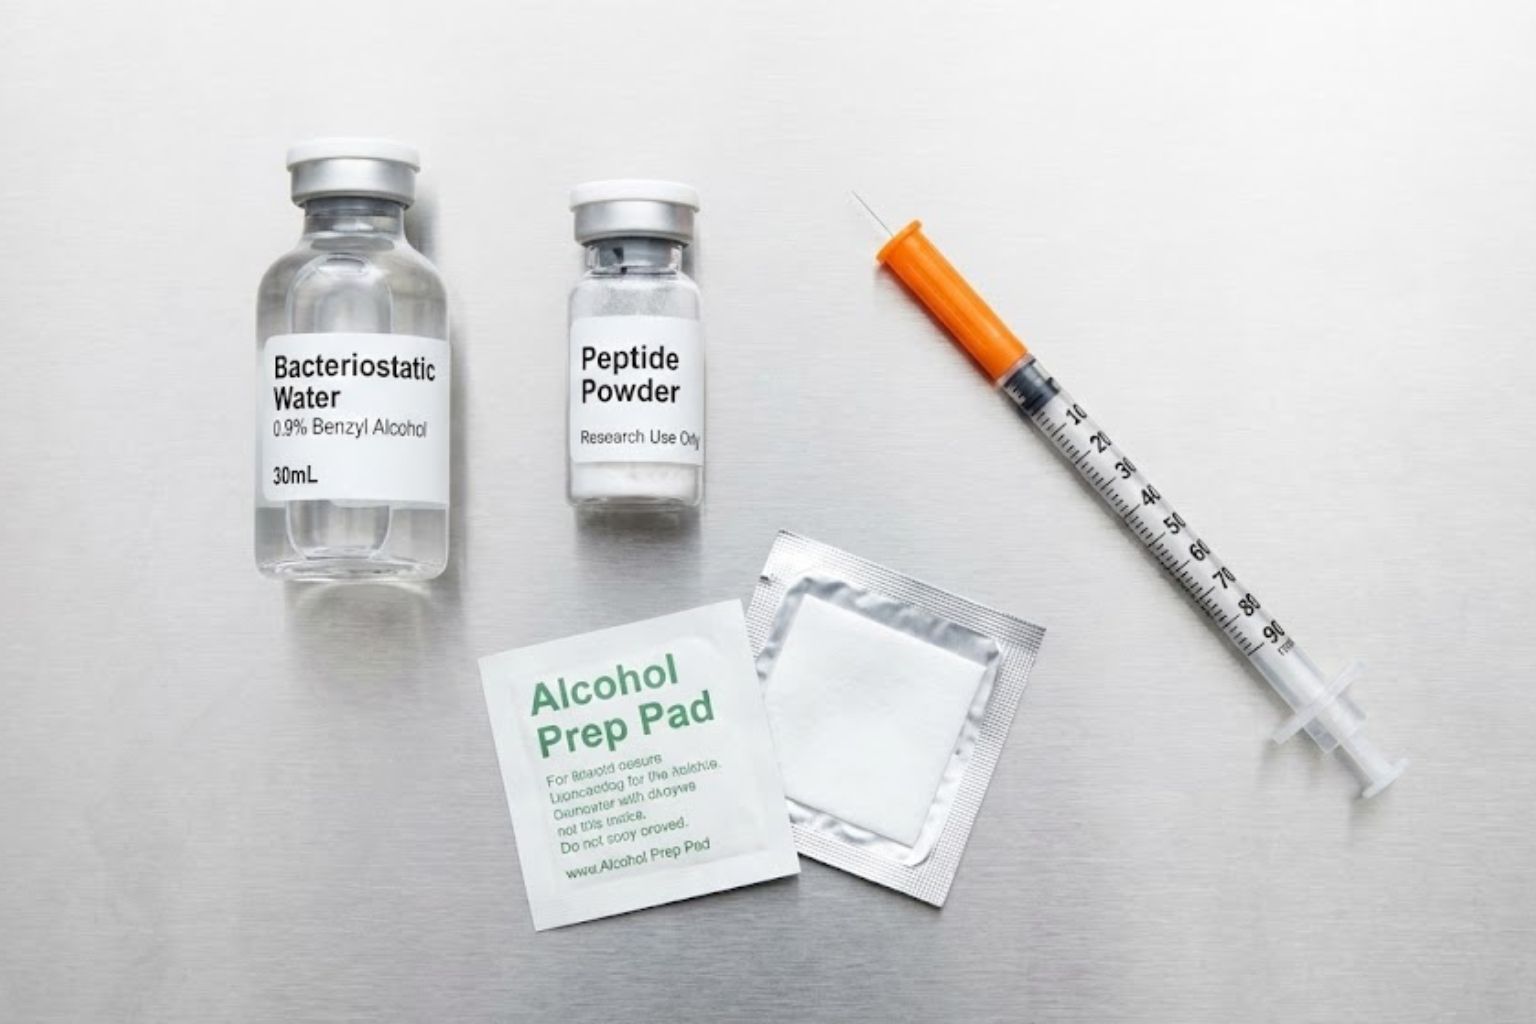
To begin reconstituting TB-500, you require the following specific items:
1. The Peptide Vial
This will typically be a glass pen peptide with a rubber stopper and a flip-off cap, containing 2mg, 5mg, or 10mg of white powder.
-
Note: The powder may look like a small “puck” at the bottom, or it may be fragmented. This does not indicate damage; it is a result of the freeze-drying process.
2. Bacteriostatic Water
This is the gold standard for reconstitution. Unlike simple “Sterile Water for Injection,” Bacteriostatic Water contains 0.9% benzyl alcohol.
-
Why it matters: The benzyl alcohol acts as a preservative. If you use standard sterile water, bacteria can begin to grow in the pen peptide within hours of the first puncture, forcing you to discard the pen peptide after a single use. Bacteriostatic water keeps the solution stable and sterile for 14–30 days under refrigeration, allowing for multi-dose research protocols.
3. Alcohol Prep Pads
70% Isopropyl alcohol wipes are non-negotiable. They are used to sterilize the rubber stoppers of the pen peptides and the skin of the subject (if applicable) or the injection port.
4. Mixing Syringe (3ml or 5ml)
This is a larger syringe used only to transport the water from the bacteriostatic pen peptide to the peptide pen peptide. A larger gauge needle (e.g., 21G or 23G) is often used here to draw the water easily.
5. Insulin Syringes (for Administration)
These are typically 1ml (1cc) or 0.5ml syringes with ultra-fine fixed needles (29G or 30G).
-
Crucial Feature: They are marked in “International Units” (IU) or simply “Units,” which allows for the high-precision measurement of micro-doses that a standard syringe cannot achieve.
3. The Step-by-Step Mixing Process
The following protocol follows standard laboratory aseptic technique.
Step 1: Environmental Control & Cleaning
Wash your hands thoroughly and wear nitrile gloves. Place your materials on a clean, flat surface.
-
The Wipe Down: Remove the plastic flip-caps from both the TB-500 pen peptide and the Bacteriostatic Water pen peptide. Vigorously wipe the exposed rubber stoppers with an alcohol pad. Wait 10 seconds for them to dry. Alcohol only kills bacteria when it dries; injecting while wet can push alcohol into the pen peptide, which damages the peptide.
Step 2: Drawing the Diluent
Take your larger Mixing Syringe. Remove the cap. Insert the needle into the Bacteriostatic Water pen peptide. Turn the pen peptide upside down.
-
The Volume Decision: Draw out the exact amount of water you plan to use. (See the “Math” section below for how to decide this). A standard volume for a 5mg pen peptide is 2ml of water.
-
De-bubbling: Flick the syringe to move air bubbles to the top and push them out. Ensure you have exactly 2.0ml of water.
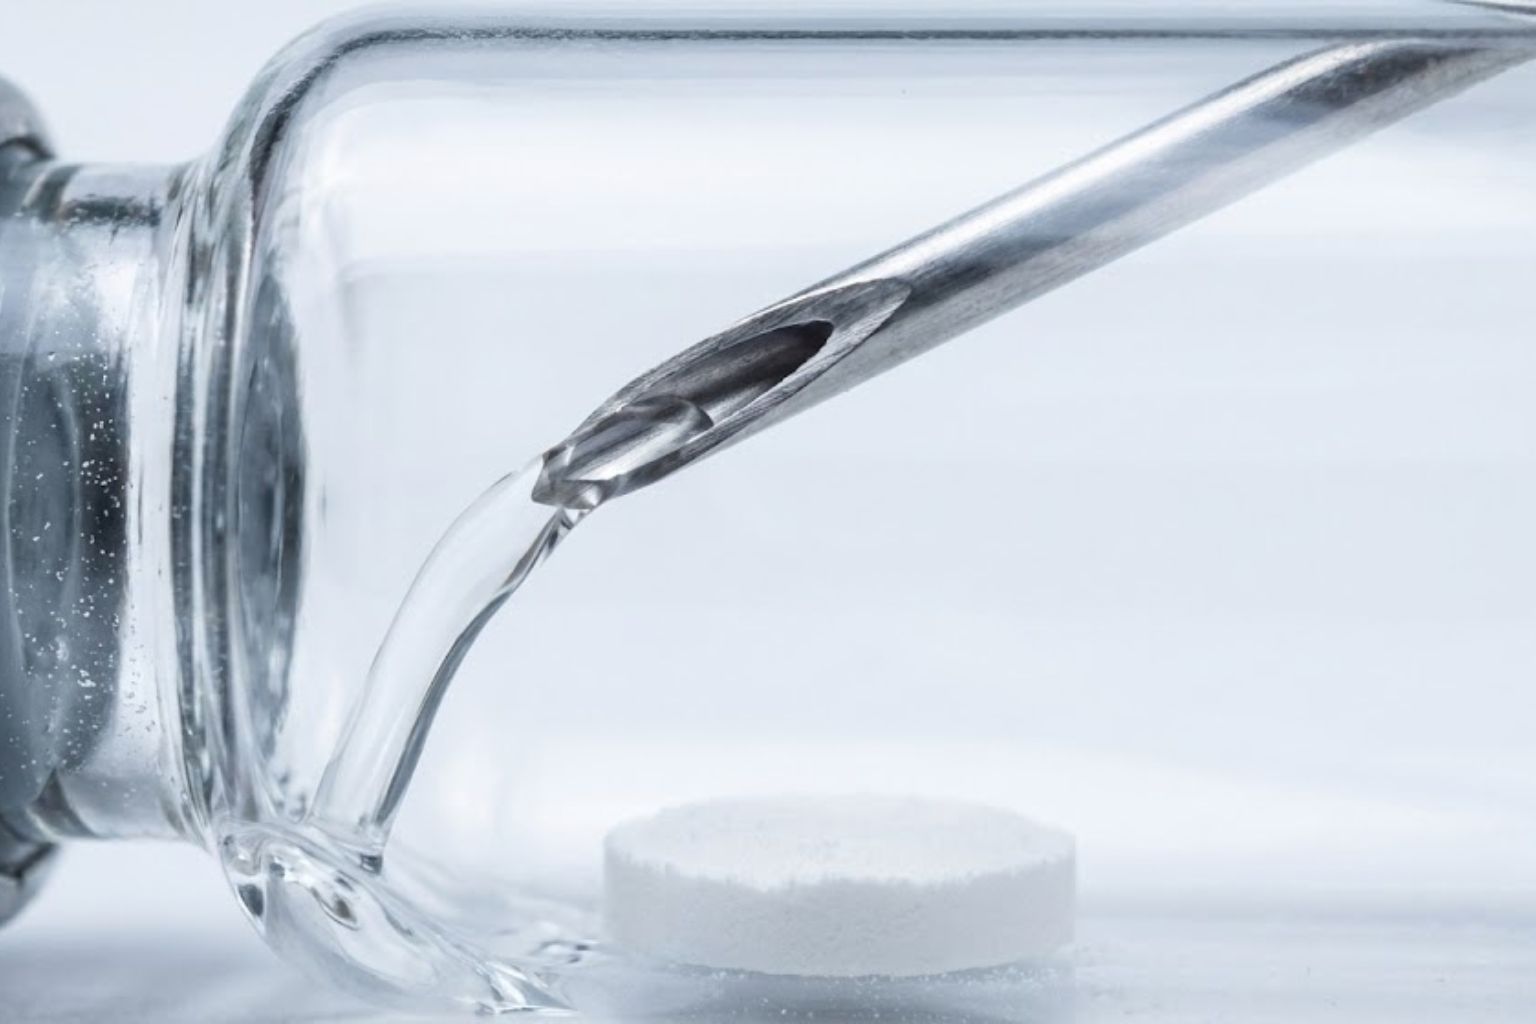
Step 3: The Critical Injection
This is the step where peptide damage most often occurs.
-
Insert the needle into the center of the TB-500 pen peptide’s rubber stopper.
-
Technique: Aim the needle toward the glass wall of the pen peptide, not directly at the powder.
-
Action: Depress the plunger slowly. You want the water to trickle down the side of the glass and gently rise around the powder.
-
Why? Blasting a jet of water directly onto the lyophilised “puck” can physically shear the delicate peptide bonds, rendering a percentage of your solution inactive.
Step 4: Equalising Pressure
Most peptide pen peptides are sealed under a vacuum (negative pressure) during manufacturing to ensure sterility.
-
The Phenomenon: When you insert the needle, you may feel the syringe plunger being “sucked” in. This is normal.
-
The Fix: After injecting the water, do not pull the needle out immediately. If the pen peptide is still under vacuum, it might suck in non-sterile room air when you withdraw. Instead, pull the plunger back to draw some air out of the pen peptide (if over-pressurized) or let the pressure equalize naturally before removing the needle.
Step 5: Dissolving (The “No Shake” Rule)
Once the water is in, the powder will begin to dissolve.
-
The Rule: Never shake the pen peptide. Shaking creates foam and bubbles. Peptides get trapped in the surface tension of foam, and when the bubbles burst, the physical force can snap the amino acid chains.
-
The Technique: Hold the pen peptide between your thumb and forefinger. Gently swirl or roll the pen peptide in a circular motion. It may take 1-2 minutes for the powder to dissolve completely. The final solution should be crystal clear (like water). If it is cloudy or has floating particles after 5 minutes, the pen peptide is bad and should be discarded.
4. The Math: Calculating Concentration
The most intimidating part of reconstituting TB-500 is the mathematics. If you cannot calculate the concentration, you cannot dose the experiment accurately.
The formula is constant: Total mg of Peptide ÷ Total mL of Water = Concentration (mg/mL)
Let’s break down the three most common scenarios using a standard 5mg pen peptide of TB-500.
Scenario A: The “Standard” Mix (2ml Water)
-
Vial: 5mg (which equals 5,000mcg)
-
Water Added: 2ml
-
The Math: 5,000mcg ÷ 2ml = 2,500mcg per ml.
-
How to Draw a Dose:
-
If your research requires a 500mcg dose:
-
500 ÷ 2,500 = 0.2 ml.
-
On a standard insulin syringe (where 1ml = 100 Units), 0.2ml is 20 Units.
-
Scenario B: The “High Concentration” Mix (1ml Water)
-
Vial: 5mg (5,000mcg)
-
Water Added: 1ml
-
The Math: 5,000mcg ÷ 1ml = 5,000mcg per ml.
-
How to Draw a Dose:
-
If your research requires a 500mcg dose:
-
500 ÷ 5,000 = 0.1 ml.
-
On an insulin syringe, this is 10 Units.
-
Pros: Less fluid volume to inject. Cons: harder to measure accurately; a tiny bubble can significantly alter the dose.
-
Scenario C: The “Precision” Mix (3ml Water)
-
Vial: 5mg (5,000mcg)
-
Water Added: 3ml (requires a larger pen peptide capacity, check your pen peptide size)
-
The Math: 5,000mcg ÷ 3ml = 1,666mcg per ml.
-
How to Draw a Dose:
-
If your research requires a 500mcg dose:
-
500 ÷ 1,666 = 0.3 ml.
-
On an insulin syringe, this is 30 Units.
-
Pros: Very easy to see on the syringe; high precision. Cons: More fluid volume.
-
The Golden Rule of Labelling
Memory is fallible; ink is not. Immediately after reconstituting, write the concentration on the pen peptide label.
-
Example: “5mg/2ml = 2.5mg/ml. Date: Dec 19.” This prevents fatal dosing errors later, especially if you have multiple pen peptides mixed with different amounts of water.
5. Choosing the Volume of Water: Why 1ml vs 2ml?
Why isn’t there a single standard for how much water to add? Because the “right” amount depends on the precision required by your specific experiment.
When to use MORE water (Dilute Solution)
-
Beginner Researchers: A dilute solution (e.g., 5mg in 2.5ml) is more forgiving. If you miss your mark on the syringe by 1 Unit, the discrepancy in actual peptide delivered is small.
-
Small Doses: If your subject requires very small doses (e.g., 100mcg), you want a dilute solution so that the liquid volume is large enough to measure. Drawing 0.02ml is nearly impossible; drawing 0.10ml is easy.
When to use LESS water (Potent Solution)
-
High Doses: If your protocol calls for high doses (e.g., 2mg per administration), you do not want to inject large volumes of fluid, which can be irritating to tissue. Using 1ml of water keeps the injection volume small.
-
Storage Space: Smaller volumes (if transferring to aliquots) take up less freezer space.
Recommendation: For most standard TB-500 research involving doses between 250mcg and 500mcg, adding 2ml of water to a 5mg pen peptide offers the best balance of measurement ease and comfortable injection volume.
6. Troubleshooting Common Issues
Even with a perfect protocol, things can go wrong.
Issue 1: The solution is cloudy.
-
Diagnosis: The peptide may not have dissolved fully, or the water is contaminated.
-
Fix: Let it sit in the fridge for 30 minutes. If it is still cloudy, do not use it. Bacterial contamination often looks like “milky” wisps. Discard it.
Issue 2: The pen peptide won’t take the water (High Pressure).
-
Diagnosis: The pen peptide has positive pressure (too much air).
-
Fix: With the needle inside the pen peptide (and the tip in the air, not the liquid), pull back on the plunger to suck excess air out of the pen peptide, then remove the needle.
Issue 3: I added too much water.
-
Diagnosis: You added 3ml instead of 2ml.
-
Fix: Do not panic. The peptide is fine. You just need to redo your math. Your concentration is now lower, so you will simply draw more units on the syringe to get the same dose of peptide.
Reconstituting TB-500 is a fundamental laboratory skill that bridges the gap between raw chemistry and biological application. It is a procedure that demands respect. By mastering the gentle “against the wall” mixing technique, understanding the necessity of bacteriostatic water, and comfortably navigating the concentration calculations, you ensure that every administration in your research subject is accurate, safe, and scientifically valid.
When the variable of “mixing error” is removed, you can trust your data. And in research, trustworthy data is the only currency that matters.