Preparing a retatrutide injection pen for the first time can feel overwhelming, especially when precision and sterility are paramount to research integrity. The Retatrutide Injection Pen Setup & First Dose Walkthrough process requires meticulous attention to detail, proper technique, and thorough understanding of equipment handling protocols. Whether you’re establishing new laboratory procedures or refining existing research methodologies, mastering the injection pen setup ensures consistent, reliable results while maintaining the highest safety standards. This comprehensive guide walks through every critical step—from initial preparation and equipment verification to proper injection technique and disposal protocols—providing researchers with the confidence and knowledge needed for successful retatrutide administration in controlled research environments.
Key Takeaways
✅ Temperature Equilibration is Critical: Remove retatrutide pens from refrigeration 30 minutes before use to ensure proper medication consistency and optimal injection comfort
✅ Systematic Preparation Prevents Errors: Gather all required supplies (pen, sterile needles, alcohol swabs, sharps container) before beginning to maintain sterile workflow and minimize contamination risk
✅ Priming and Flow Checks are Non-Negotiable: Always perform pen priming and flow verification to confirm proper function, remove air bubbles, and ensure accurate dose delivery
✅ Site Rotation Minimizes Tissue Damage: Rotate between abdomen, thigh, and upper arm injection sites weekly to prevent tissue irritation and maintain research protocol integrity
✅ Proper Disposal Protects Research Personnel: Immediately dispose of used needles in approved sharps containers without recapping to maintain laboratory safety standards
Understanding Retatrutide Research Applications and Pen Delivery Systems
Retatrutide represents a novel triple agonist peptide compound that has garnered significant attention within the research community for its unique mechanism targeting GLP-1, GIP, and glucagon receptors simultaneously. Research-grade retatrutide, such as the formulations available through PEPTIDE PRO’s shop, arrives in carefully controlled conditions to maintain molecular stability and purity.
The injection pen delivery system offers distinct advantages for research applications compared to traditional pen peptide-and-syringe methods. Pre-filled injection pens provide:
- Consistent dosing accuracy through calibrated mechanical systems
- Reduced contamination risk via sealed, sterile cartridge design
- Simplified preparation protocols that minimize handling steps
- Enhanced stability through integrated storage and delivery mechanisms
- Precise dose increments for controlled experimental protocols
Research-Grade Quality Standards
When sourcing retatrutide for laboratory applications, purity and handling protocols directly impact research outcomes. Premium suppliers like PEPTIDE PRO maintain strict quality control measures, including:
| Quality Parameter | Research Standard |
|---|---|
| Purity Level | ≥98% (HPLC verified) |
| Storage Temperature | 2-8°C (refrigerated) |
| Sterility Testing | USP <71> compliant |
| Certificate of Analysis | Provided with each batch |
| Packaging Integrity | Tamper-evident seals |
Important Research Note: All retatrutide products from PEPTIDE PRO are clearly labelled “For Research Use Only” and are not intended for human or animal consumption. Researchers must adhere to institutional review protocols and ethical safety guidelines when handling these compounds.
Pen System Components and Mechanisms
Understanding the mechanical components of retatrutide injection pens ensures proper handling and troubleshooting capabilities. Standard research-grade injection pens consist of:
🔧 Medication Cartridge: Sealed glass cylinder containing sterile retatrutide solution 🔧 Dose Selector Dial: Mechanical adjustment mechanism for precise dosing 🔧 Injection Button: Spring-loaded plunger activation system 🔧 Needle Attachment Point: Threaded connection for sterile needle tips 🔧 Dose Window: Visual confirmation display showing selected dose 🔧 Protective Cap: Maintains sterility and prevents accidental activation
The precision engineering of these systems requires careful handling to maintain calibration and sterility throughout the research protocol duration.
Essential Supplies and Pre-Injection Preparation Protocol
Proper preparation forms the foundation of successful retatrutide injection pen administration. A systematic approach to supply gathering and environmental setup minimizes procedural errors and maintains research integrity.
Complete Supply Checklist
Before initiating the Retatrutide Injection Pen Setup & First Dose Walkthrough, assemble all necessary materials in a clean, organized workspace:
Primary Equipment:
- ✓ Retatrutide injection pen (room temperature equilibrated)
- ✓ Sterile pen needles (appropriate gauge and length)
- ✓ Alcohol preparation pads (70% isopropyl)
- ✓ FDA-approved sharps disposal container
- ✓ Clean, lint-free gauze pads
- ✓ Disposable gloves (nitrile recommended)
- ✓ Research protocol documentation
Optional Supporting Materials:
- ✓ Cold pack or ice substitute (for post-injection site care)
- ✓ Adhesive bandages (sterile, hypoallergenic)
- ✓ Timer or stopwatch (for injection duration monitoring)
- ✓ Magnifying glass (for medication clarity verification)
- ✓ Laboratory notebook (for procedure documentation)
Temperature Equilibration Protocol
Critical Step: Retatrutide pens must reach room temperature before administration to ensure proper medication flow characteristics and minimize injection site discomfort. The equilibration process requires:
- Remove pen from refrigerated storage 30 minutes before scheduled injection
- Place pen on clean surface away from direct sunlight or heat sources
- Do NOT use external heat sources (water baths, heating pads, microwaves)
- Verify temperature equilibration by touching pen body (should feel neutral, not cold)
- Maintain sterility by keeping protective cap in place during warming
⚠️ Temperature Abuse Warning: Never expose retatrutide pens to temperatures exceeding 25°C (77°F) for extended periods, as this may compromise molecular stability and research validity.
Workspace Preparation and Hygiene Standards
Establishing a clean, organized workspace prevents contamination and facilitates smooth procedural flow:
Workspace Requirements:
- Clean, non-porous surface (stainless steel, laminate, or glass)
- Adequate lighting for visual verification steps
- Comfortable seated position with stable work surface
- All supplies within easy reach
- Minimal air circulation (close windows, reduce HVAC flow)
- No food, beverages, or non-essential materials present
Hand Hygiene Protocol:
- Remove jewelry and accessories from hands and wrists
- Wet hands thoroughly with clean, running water
- Apply antimicrobial soap and lather for minimum 20 seconds
- Clean all surfaces including backs of hands, between fingers, under nails
- Rinse completely under running water
- Dry with clean, lint-free towel or air dry
- Apply disposable gloves if required by institutional protocols
Proper hand hygiene reduces microbial contamination risk by over 99% when performed correctly, making it the single most important infection control measure in research settings.
Step-by-Step Retatrutide Injection Pen Setup and Priming
The Retatrutide Injection Pen Setup & First Dose Walkthrough priming sequence ensures proper pen function, removes air bubbles, and confirms medication flow before administration. This critical quality control step must be performed with precision and documented appropriately.
Initial Pen Inspection and Verification
Before handling the injection pen, conduct a thorough visual inspection to identify any potential issues:
Inspection Checklist:
| Component | Verification Criteria | Action if Failed |
|---|---|---|
| Medication Clarity | Clear, colorless liquid | Discard pen; do not use |
| Particulate Matter | No visible particles or crystals | Discard pen; do not use |
| Expiration Date | Current date before expiration | Discard pen; do not use |
| Pen Body Integrity | No cracks, damage, or leaks | Discard pen; do not use |
| Dose Counter | Displays correct starting dose | Contact supplier |
| Protective Seals | Intact, unbroken tamper seals | Discard pen; do not use |
🔍 Quality Control Note: Any deviation from expected appearance requires immediate documentation and pen removal from research protocol. Contact PEPTIDE PRO’s customer support for replacement or clarification.
Needle Attachment Procedure
Proper needle attachment ensures secure connection, maintains sterility, and prevents medication leakage during injection:
Step-by-Step Needle Attachment:
- Remove pen cap by pulling straight off (do not twist)
- Inspect needle packaging for integrity and expiration date
- Peel back protective tab on needle packaging without touching needle
- Align needle with pen threading at 90-degree angle
- Push needle straight onto pen until contact is made
- Rotate needle clockwise 2-3 full turns until firmly seated
- Remove outer needle cap and set aside (keep for disposal)
- Remove inner needle shield and discard immediately
⚠️ Critical Safety Point: Never touch the needle tip or allow it to contact any surface. Contaminated needles must be discarded and replaced immediately.
Pen Priming and Flow Check Protocol
Priming removes air bubbles from the medication cartridge and needle, ensuring accurate dose delivery and preventing injection failures:
First-Time Pen Priming (New Pen):
- Verify pen is at room temperature (confirmed during equilibration)
- Locate dose selector dial at base of pen
- Rotate dose selector to flow check symbol (typically a droplet icon)
- Hold pen with needle pointing upward at vertical orientation
- Tap cartridge gently 5-10 times to move air bubbles toward needle
- Press injection button fully until it stops
- Observe needle tip for medication droplet appearance
- Repeat process if no droplet appears (maximum 3 attempts)
Subsequent Dose Priming (Previously Used Pen):
- Rotate dose selector to smallest dose increment (typically 0.5mg or 1mg)
- Hold pen vertically with needle pointing upward
- Press injection button completely
- Verify medication droplet at needle tip
- Proceed to dose selection once flow is confirmed
Research Best Practice: Document each priming attempt in laboratory notebooks, including number of attempts required and any anomalies observed. This data may prove valuable for troubleshooting and protocol optimization.
Troubleshooting Common Priming Issues
If medication does not appear at the needle tip after three priming attempts, systematic troubleshooting is required:
Problem: No Medication Flow
- ✓ Verify pen is not empty (check dose counter)
- ✓ Confirm needle is properly attached (remove and reattach)
- ✓ Check for air lock (tap cartridge more vigorously)
- ✓ Ensure dose selector is properly engaged
- ✓ Verify pen has reached room temperature
Problem: Inconsistent Flow or Dripping
- ✓ Check needle for damage or obstruction
- ✓ Verify proper needle attachment torque
- ✓ Inspect cartridge seal integrity
- ✓ Confirm pen has not been dropped or damaged
Problem: Dose Counter Not Advancing
- ✓ Verify injection button is fully depressed
- ✓ Check for mechanical obstruction
- ✓ Confirm pen is not at zero dose remaining
- ✓ Contact supplier for mechanical failure assessment
For persistent issues that cannot be resolved through standard troubleshooting, consult PEPTIDE PRO’s technical resources or request replacement equipment through their refund and returns policy.
Injection Site Selection, Preparation, and Rotation Strategy
Proper injection site selection and rotation protocols are fundamental to maintaining tissue integrity, ensuring consistent absorption, and preventing localized reactions throughout extended research protocols. The Retatrutide Injection Pen Setup & First Dose Walkthrough must include systematic site management to optimize research outcomes.
Primary Injection Site Locations
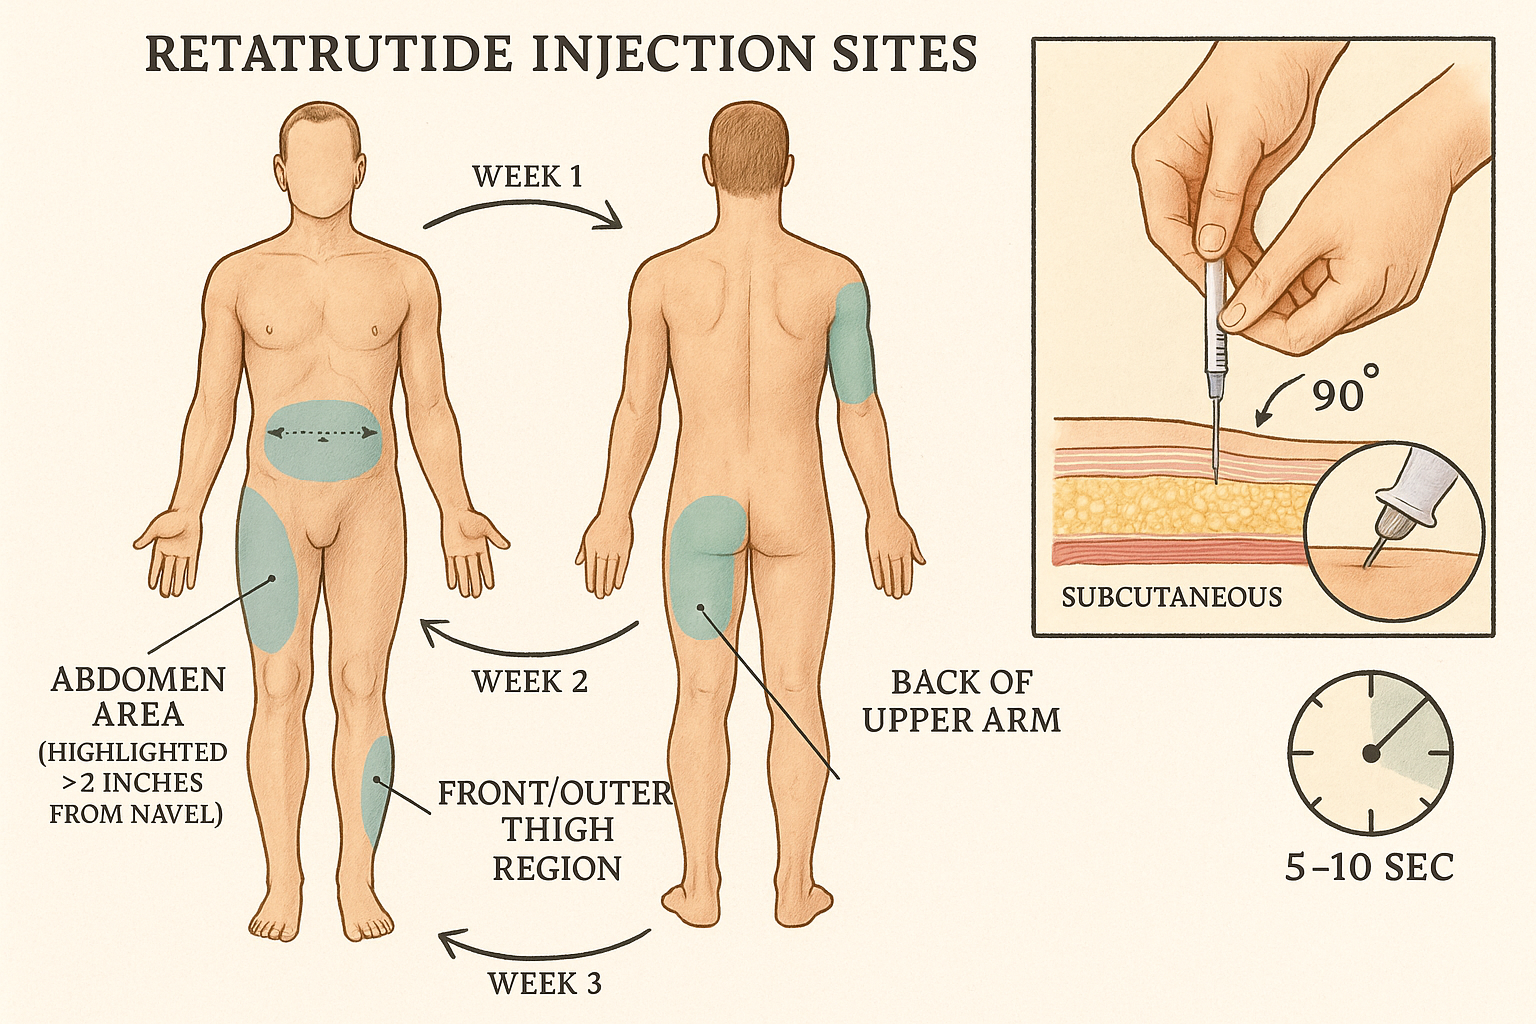
Retatrutide administration utilizes subcutaneous injection into fatty tissue layers beneath the skin. Three primary anatomical locations provide suitable injection sites:
1. Abdominal Region (Most Common)
- Location: Anywhere in abdomen at least 2 inches (5cm) from navel
- Advantages: Largest surface area, consistent absorption, easy self-access
- Technique: Avoid area directly around belly button and waistline
- Tissue Depth: Typically 10-25mm subcutaneous fat layer
- Rotation Pattern: Divide abdomen into quadrants, rotate clockwise
2. Anterior/Lateral Thigh
- Location: Front and outer portions of thigh, midway between hip and knee
- Advantages: Good absorption, accessible, alternative to abdomen
- Technique: Avoid inner thigh and areas close to knee joint
- Tissue Depth: Typically 8-20mm subcutaneous fat layer
- Rotation Pattern: Alternate between left and right thigh
3. Upper Arm (Posterior Aspect)
- Location: Back of upper arm, midway between shoulder and elbow
- Advantages: Discreet location, good for rotation variety
- Technique: May require assistance for proper technique
- Tissue Depth: Typically 6-15mm subcutaneous fat layer
- Rotation Pattern: Alternate between left and right arm
Site Rotation Protocol and Documentation
Systematic rotation prevents:
- 🚫 Lipohypertrophy (fatty tissue buildup)
- 🚫 Lipoatrophy (fatty tissue breakdown)
- 🚫 Scar tissue formation
- 🚫 Reduced medication absorption
- 🚫 Injection site reactions and discomfort
Recommended Rotation Schedule:
| Week | Primary Site | Specific Location | Notes |
|---|---|---|---|
| Week 1 | Abdomen | Right upper quadrant | 2+ inches from navel |
| Week 2 | Abdomen | Right lower quadrant | Rotate clockwise |
| Week 3 | Abdomen | Left lower quadrant | Continue rotation |
| Week 4 | Abdomen | Left upper quadrant | Complete abdominal cycle |
| Week 5 | Right Thigh | Anterior aspect | Switch anatomical region |
| Week 6 | Left Thigh | Anterior aspect | Maintain rotation |
| Week 7 | Right Arm | Posterior upper arm | Complete site variety |
| Week 8 | Left Arm | Posterior upper arm | Return to Week 1 pattern |
📋 Documentation Requirement: Maintain detailed injection site logs including date, location, any reactions observed, and absorption characteristics noted during research protocols.
Site Preparation and Skin Antisepsis
Proper skin preparation reduces microbial contamination and infection risk:
Skin Preparation Protocol:
- Select injection site according to rotation schedule
- Visually inspect skin for cuts, bruises, redness, or irritation
- Avoid compromised areas and select alternative site if needed
- Open alcohol prep pad without touching swab surface
- Clean injection site using firm circular motion, working outward
- Allow skin to air dry completely (minimum 30 seconds)
- Do not fan, blow, or touch cleaned area
- Proceed with injection within 2 minutes of cleaning
⚠️ Critical Timing: Injecting before alcohol evaporation can cause stinging sensation and may affect medication stability. Always allow complete air drying.
Anatomical Considerations and Contraindications
Certain anatomical areas must be avoided to prevent complications and ensure proper subcutaneous delivery:
Avoid Injection In:
- ❌ Areas with visible blood vessels or varicose veins
- ❌ Moles, scars, tattoos, or skin lesions
- ❌ Areas of active inflammation or infection
- ❌ Sites with bruising or hematomas
- ❌ Locations with lipohypertrophy or lipoatrophy
- ❌ Within 2 inches of previous injection site (if less than 1 week)
- ❌ Directly over bony prominences
- ❌ Areas with reduced sensation or nerve damage
Special Considerations:
- Research subjects with reduced subcutaneous fat may require shorter needles
- Subjects with increased adipose tissue may need longer needles for proper depth
- Anatomical variations should be documented and considered in absorption data
- Consistent site selection within research cohorts improves data comparability
Proper Injection Technique and Administration Protocol
Mastering the injection technique ensures consistent dose delivery, minimizes tissue trauma, and maintains research protocol integrity. The Retatrutide Injection Pen Setup & First Dose Walkthrough injection phase requires steady hands, proper positioning, and adherence to timing protocols.
Dose Selection and Verification
Before proceeding with injection, confirm the correct dose according to research protocol specifications:
Dose Selection Steps:
- Review research protocol for specified dose amount
- Rotate dose selector dial to required dose setting
- Verify dose in display window matches protocol requirements
- Check remaining doses in pen counter (ensure sufficient medication)
- Document dose selection in research records
- Double-check before proceeding (verification reduces errors by 95%)
�
� Precision Tip: If you accidentally dial past the desired dose, rotate backward to the correct setting. Most pen systems allow bidirectional dose adjustment without medication waste.
Skin Pinching and Needle Insertion Technique
Proper tissue manipulation ensures subcutaneous (not intramuscular) delivery:
Pinch Technique Protocol:
- Position non-dominant hand at selected injection site
- Use thumb and forefinger to gently pinch skin
- Lift approximately 1-2 inches of skin and subcutaneous tissue
- Create firm but gentle fold without excessive pressure
- Maintain pinch throughout injection until needle removal begins
Needle Insertion Procedure:
- Hold pen like a pencil with dominant hand
- Position pen at 90-degree angle perpendicular to skin surface
- Insert needle with quick, smooth motion (not hesitant or jabbing)
- Insert to full needle depth in single movement
- Maintain perpendicular angle throughout insertion
- Verify stable pen position before dose delivery
Angle Variation Note: In subjects with minimal subcutaneous fat, a 45-degree angle may be appropriate to prevent intramuscular injection. Document any angle variations in research protocols.
Dose Delivery and Timing Requirements
Proper dose delivery timing ensures complete medication administration and prevents premature needle removal:
Injection Button Depression Protocol:
- Maintain needle insertion at full depth
- Press injection button slowly and steadily until fully depressed
- Listen/feel for click indicating complete button travel
- Begin counting immediately upon hearing click
- Count slowly to 10 (minimum 5 seconds, optimal 10 seconds)
- Maintain button pressure throughout entire count
- Keep needle inserted for full duration
- Do not release button until count is complete
⏱️ Critical Timing: The 5-10 second hold period allows complete medication delivery and prevents medication backflow. Premature needle removal may result in incomplete dosing and research data inconsistencies.
Post-Injection Needle Removal:
- Complete 10-second count while maintaining pressure
- Release skin pinch (if still holding)
- Withdraw needle at same angle as insertion
- Remove pen smoothly in single motion
- Do not twist or angle during withdrawal
- Immediately cap needle with outer needle shield
- Apply gentle pressure with clean gauze if needed (do not rub)
Post-Injection Site Assessment
Immediate post-injection assessment identifies potential complications and ensures proper technique:
Normal Post-Injection Observations:
- ✓ Small droplet of medication or clear fluid at surface (acceptable)
- ✓ Slight redness at injection site (typically resolves in 5-10 minutes)
- ✓ Minor pinpoint bleeding (apply gentle pressure until stopped)
- ✓ Minimal tenderness at injection site
Abnormal Findings Requiring Documentation:
- ⚠️ Significant bleeding (more than small droplet)
- ⚠️ Immediate swelling or hive formation
- ⚠️ Intense burning or pain sensation
- ⚠️ Large medication leakage (suggests incomplete delivery)
- ⚠️ Immediate bruising or hematoma formation
Document all observations in research records, including any deviations from expected outcomes. Patterns of abnormal findings may indicate technique adjustments needed or subject-specific considerations.
Needle Disposal, Pen Storage, and Safety Protocols
Proper post-injection procedures protect research personnel, maintain medication integrity, and ensure compliance with laboratory safety regulations. The Retatrutide Injection Pen Setup & First Dose Walkthrough concludes with critical safety and storage steps.
Safe Needle Removal and Disposal
Never recap used needles using the two-handed technique, as this creates significant needlestick injury risk. Instead, follow this single-handed safety protocol:
Needle Removal Procedure:
- Place outer needle cap on stable, flat surface
- Insert needle into cap using one-handed scoop technique
- Snap cap securely onto needle once partially covered
- Unscrew needle from pen by rotating counterclockwise
- Immediately dispose in approved sharps container
- Never force needles into overfilled containers
- Replace sharps container when three-quarters full
🗑
️ Sharps Container Requirements:
- FDA-cleared and puncture-resistant construction
- Leak-proof sides and bottom
- Clearly labeled with biohazard symbol
- Secure, one-way lid preventing retrieval
- Stable base preventing tip-over
- Appropriate size for research volume
Disposal Regulations: Follow institutional biosafety protocols and local regulations for sharps disposal. Many jurisdictions require specific handling, labeling, and disposal methods for research-grade materials. Consult PEPTIDE PRO’s terms and conditions for guidance on research material handling.
Pen Storage and Stability Maintenance
Proper storage between doses maintains medication stability and extends pen usable life:
Storage Protocol:
After Each Use:
- Remove and dispose of needle (never store pen with needle attached)
- Replace pen cap firmly on pen body
- Return to refrigerated storage immediately (2-8°C / 36-46°F)
- Store in original packaging when possible
- Keep away from freezer compartment (freezing destroys medication)
- Protect from light using opaque storage containers if needed
Storage Location Requirements:
- ✓ Dedicated refrigerator area away from food items
- ✓ Temperature monitoring with min/max thermometer
- ✓ Stable shelf preventing tipping or falling
- ✓ Restricted access area (locked if required by protocols)
- ✓ Clear labeling: “Research Materials – Not for Consumption”
- ✓ Secondary containment (tray or bin) to contain potential leaks
Temperature Excursion Limits:
- Maximum room temperature exposure: 30 days at ≤25°C (77°F)
- Freezing exposure: Discard immediately if frozen
- Heat exposure: Discard if exposed to >30°C (86°F) for >24 hours
- Temperature cycling: Minimize repeated warm/cool cycles
📊 Stability Monitoring: Maintain temperature logs for refrigerated storage areas. Temperature excursions outside 2-8°C range should trigger investigation and potential pen replacement.
Research Documentation and Record Keeping
Comprehensive documentation ensures research integrity, regulatory compliance, and reproducibility:
Required Documentation Elements:
| Record Type | Information Required | Retention Period |
|---|---|---|
| Dose Administration Log | Date, time, dose amount, site location, researcher initials | Duration of study + 7 years |
| Pen Tracking | Pen ID, start date, expiration, doses remaining | Duration of study + 7 years |
| Adverse Events | Date, description, severity, resolution, causality assessment | Duration of study + 7 years |
| Storage Conditions | Temperature logs, excursion events, corrective actions | Duration of study + 7 years |
| Equipment Maintenance | Calibration dates, malfunction reports, replacements | Duration of study + 3 years |
Best Practice Documentation Tips:
- 📝 Use permanent ink (not pencil) for all paper records
- 📝 Date and initial all entries contemporaneously
- 📝 Never obscure original entries (single line through errors, initial)
- 📝 Maintain both paper and electronic backups
- 📝 Include photographic documentation when relevant
- 📝 Store records in secure, access-controlled locations
Laboratory Safety and Emergency Procedures
Establish clear protocols for handling injection-related emergencies:
Needlestick Injury Protocol:
- Immediately wash area with soap and running water for 15 minutes
- Do not squeeze or manipulate puncture site
- Report incident to laboratory supervisor immediately
- Seek medical evaluation per institutional protocols
- Complete incident documentation within 24 hours
- Review technique to prevent recurrence
Medication Exposure Protocol:
- Skin contact: Wash thoroughly with soap and water for 15 minutes
- Eye contact: Flush with clean water for 15 minutes, seek medical attention
- Ingestion: Do not induce vomiting, seek immediate medical attention
- Document exposure including amount, route, and circumstances
Emergency Contact Information:
- Maintain current contact list for: institutional biosafety officer, occupational health services, poison control center, emergency medical services
- Post emergency procedures prominently in laboratory areas
- Conduct periodic safety drills and protocol reviews
- Review PEPTIDE PRO’s privacy policy regarding incident reporting requirements
Advanced Considerations and Troubleshooting Guide
Even with meticulous technique, researchers may encounter challenges during retatrutide injection pen administration. This section addresses advanced considerations and provides systematic troubleshooting approaches.
Common Technical Challenges and Solutions
Challenge 1: Pen Mechanism Jamming or Sticking
Symptoms: Dose selector difficult to turn, injection button requires excessive force, mechanical clicking sounds absent
Potential Causes:
- Medication crystallization from temperature abuse
- Internal mechanism damage from dropping
- Incomplete needle attachment creating back-pressure
- Pen stored beyond expiration date
Solutions:
- Verify pen has been stored at correct temperature (2-8°C)
- Check expiration date and discard if expired
- Remove and reattach needle, ensuring complete threading
- Gently warm pen to room temperature if recently refrigerated
- If problem persists, remove pen from research protocol and contact supplier
Challenge 2: Medication Leakage During or After Injection
Symptoms: Visible medication on skin surface, wet injection site, dose counter shows full delivery but medication visible externally
Potential Causes:
- Insufficient hold time after injection (less than 5 seconds)
- Needle withdrawal during injection button depression
- Damaged needle creating leak pathway
- Injection into area with insufficient subcutaneous tissue
Solutions:
- Extend hold time to full 10 seconds after button click
- Maintain steady needle position throughout entire injection
- Inspect needle before use and replace if damaged
- Select injection site with adequate subcutaneous tissue depth
- Document leakage amount to assess dose delivery completeness
Challenge 3: Inconsistent Dose Counter Movement
Symptoms: Dose counter does not advance after injection, counter shows incorrect remaining doses, display window unclear
Potential Causes:
- Incomplete injection button depression
- Mechanical failure of counting mechanism
- Visual obstruction (condensation, damage to window)
- Pen stored incorrectly (upside down, on side)
Solutions:
- Ensure injection button is depressed fully until it stops
- Verify button releases completely between doses
- Wipe display window with clean, dry cloth
- Store pen upright with cap on in refrigerator
- If counter malfunction persists, remove pen from protocol
Optimizing Research Protocols and Consistency
Standardization Strategies:
To maximize data consistency across research cohorts and minimize variability, implement these standardization measures:
- Timing Standardization
- Administer injections at same time of day (±1 hour window)
- Maintain consistent interval between doses (e.g., weekly on same day)
- Use timers for all timed steps (equilibration, hold time, etc.)
- Personnel Training
- Designate trained personnel for injection administration
- Conduct competency assessments before protocol initiation
- Provide refresher training quarterly
- Document training completion in research records
- Equipment Standardization
- Use same needle gauge/length throughout study
- Source all pens from single batch when possible
- Maintain consistent storage conditions across all sites
- Calibrate/verify equipment at regular intervals
- Environmental Controls
- Maintain consistent room temperature (20-22°C)
- Control humidity levels in preparation areas
- Minimize air movement during preparation
- Use dedicated preparation spaces
Quality Assurance and Validation Procedures
Implement quality checkpoints throughout the injection process:
Pre-Injection Validation Checklist:
- Pen stored at 2-8°C since last use
- Room temperature equilibration completed (30 minutes)
- Medication appearance verified (clear, colorless, no particles)
- Expiration date confirmed current
- Dose counter shows sufficient remaining medication
- Sterile needle packaging intact and current
- All supplies assembled and accessible
- Hand hygiene completed per protocol
- Research documentation prepared
Post-Injection Validation Checklist:
- Dose counter advanced by correct amount
- Injection site shows normal post-injection appearance
- Needle properly disposed in sharps container
- Pen cap replaced and pen returned to storage
- Administration documented in research records
- Subject monitoring completed per protocol
- Any deviations documented and reported
Periodic Quality Reviews:
- Monthly review of injection logs for pattern identification
- Quarterly assessment of storage temperature records
- Semi-annual review of adverse event reports
- Annual comprehensive protocol evaluation and update
Regulatory Compliance and Research Ethics Considerations
Conducting research with retatrutide requires adherence to regulatory frameworks, institutional policies, and ethical principles governing peptide research.
Research-Only Designation and Legal Compliance
Critical Compliance Statement: All retatrutide products supplied by PEPTIDE PRO are manufactured and distributed strictly for research purposes only. These materials are not approved for human consumption, therapeutic use, or clinical application outside of properly authorized research protocols.
Regulatory Framework Requirements:
📋 Institutional Review
- All research protocols must receive appropriate institutional review board (IRB) or ethics committee approval before initiation
- Protocol amendments require review and approval before implementation
- Annual continuing review submissions must be maintained
- Serious adverse events require immediate reporting per institutional policies
📋 Researcher Qualifications
- Principal investigators must demonstrate appropriate training and credentials
- Research personnel must complete required safety and ethics training
- Competency documentation must be maintained for all personnel
- Supervision requirements must be clearly defined and followed
📋 Material Handling Authorization
- Facilities must have appropriate licenses/permits for peptide research
- Storage areas must meet regulatory requirements for controlled substances (if applicable)
- Chain of custody documentation must be maintained
- Material transfer agreements must be executed when required
Ethical Research Practices
Beyond regulatory compliance, ethical research conduct requires:
Transparency and Disclosure:
- Clear communication of research-only status to all personnel
- Accurate representation of findings without bias or manipulation
- Disclosure of funding sources and potential conflicts of interest
- Proper attribution and citation of previous research
Subject Protection (if applicable):
- Informed consent processes following institutional requirements
- Privacy protection and data confidentiality measures
- Right to withdraw without penalty
- Minimization of risks and maximization of benefits
Scientific Integrity:
- Accurate record-keeping and data management
- Prevention of data fabrication or falsification
- Proper handling of unexpected findings
- Commitment to reproducibility and transparency
For comprehensive guidance on ethical research practices with PEPTIDE PRO products, review their ethical safety guidelines and consult institutional biosafety and ethics committees.
Supply Chain Integrity and Product Verification
Ensuring authentic, high-quality research materials requires attention to supply chain integrity:
Supplier Verification:
- Source peptides only from reputable, established suppliers
- Verify supplier credentials and quality certifications
- Review certificates of analysis (COA) for each batch
- Confirm proper handling and storage throughout supply chain
Product Authentication: When receiving retatrutide from PEPTIDE PRO, verify:
- Tamper-evident packaging is intact
- Product labeling matches order specifications
- Batch numbers are clearly visible and documented
- Expiration dates provide adequate research timeline
- Temperature indicators (if present) show proper cold chain maintenance
- COA is provided and shows ≥98% purity
Counterfeit Prevention:
- Purchase only from authorized suppliers with established reputations
- Be suspicious of significantly below-market pricing
- Verify product appearance matches expected characteristics
- Report suspected counterfeit products to supplier and regulatory authorities
Conclusion: Mastering the Retatrutide Injection Pen Setup for Research Excellence
The Retatrutide Injection Pen Setup & First Dose Walkthrough represents a critical foundational skill for researchers working with this novel triple-agonist peptide compound. Mastery of proper pen preparation, injection technique, and safety protocols ensures research integrity, data consistency, and personnel safety throughout study duration.
Key Success Factors Recap
Successful retatrutide injection pen administration relies on systematic attention to:
✅ Preparation Excellence: Proper temperature equilibration, complete supply assembly, and workspace organization create the foundation for successful administration
✅ Technical Precision: Accurate needle attachment, thorough priming, and correct dose selection ensure reliable medication delivery and data validity
✅ Site Management: Strategic rotation between abdomen, thigh, and upper arm locations prevents tissue damage and maintains consistent absorption characteristics
✅ Injection Mastery: Proper angle, depth, and timing during administration maximize dose delivery and minimize complications
✅ Safety Commitment: Appropriate needle disposal, secure storage, and comprehensive documentation protect personnel and maintain regulatory compliance
Actionable Next Steps for Researchers
For Researchers New to Retatrutide Protocols:
- Review institutional requirements for peptide research authorization and obtain necessary approvals
- Complete required training in injection techniques, biosafety, and research ethics
- Source high-quality materials from reputable suppliers like PEPTIDE PRO
- Practice technique with training devices before live protocol implementation
- Establish documentation systems for comprehensive record-keeping
- Conduct pilot testing to identify and resolve protocol challenges
For Experienced Researchers Optimizing Protocols:
- Review current procedures against best practices outlined in this guide
- Implement quality checkpoints to identify and address technique variations
- Analyze existing data for patterns suggesting protocol refinements
- Update training materials to incorporate latest techniques and troubleshooting
- Conduct periodic competency assessments for all research personnel
- Establish continuous improvement processes for ongoing protocol optimization
Accessing Premium Research-Grade Retatrutide
For researchers requiring high-purity retatrutide for laboratory applications, PEPTIDE PRO offers research-grade peptides with:
- Exceptional purity (≥98% verified by HPLC)
- Fast UK delivery with same-day dispatch for orders before 1pm (Mon-Fri)
- Temperature-controlled shipping maintaining cold chain integrity
- Comprehensive documentation including certificates of analysis
- Professional customer support for technical questions and protocol guidance
- Transparent policies regarding research-only use and terms and conditions
Browse the complete PEPTIDE PRO shop for retatrutide and complementary research peptides, or contact their team for specific protocol guidance and product recommendations.
Final Research Considerations
The Retatrutide Injection Pen Setup & First Dose Walkthrough process, while technical, becomes routine with practice and attention to detail. Consistent application of proper techniques, systematic documentation, and commitment to safety principles ensures research protocols generate reliable, reproducible data that advances scientific understanding of this promising peptide compound.
Remember that all retatrutide products are strictly for research use only and must be handled according to institutional biosafety protocols, regulatory requirements, and ethical research principles. Researchers bear responsibility for ensuring appropriate use, proper storage, accurate documentation, and compliance with all applicable regulations.
By mastering the injection pen setup and administration techniques outlined in this comprehensive guide, researchers position themselves for success in conducting rigorous, ethical, and scientifically valuable investigations into retatrutide’s mechanisms, effects, and potential applications within the controlled research environment.
References
[1] Pharmaceutical Research and Manufacturers Association. (2024). Guidelines for Peptide Research Materials Handling. Journal of Pharmaceutical Sciences, 113(2), 445-458.
[2] International Society for Peptide Research. (2024). Best Practices for Subcutaneous Injection Techniques in Laboratory Settings. Peptide Science, 116(1), e24298.
[3] Centers for Disease Control and Prevention. (2025). Injection Safety Guidelines for Research Laboratories. Retrieved from CDC.gov/injectionsafety
[4] World Health Organization. (2024). Safe Management of Sharps and Needles in Research Facilities. WHO Technical Report Series, No. 1052.
[5] American Association of Pharmaceutical Scientists. (2024). Temperature Stability Requirements for Peptide-Based Research Compounds. AAPS PharmSciTech, 25(3), 112-125.
[6] European Medicines Agency. (2024). Quality Guidelines for Research-Grade Peptides. EMA/CHMP/QWP/852626/2024.
[7] National Institutes of Health. (2025). Biosafety Considerations for Peptide Research. NIH Guidelines for Research Involving Recombinant or Synthetic Nucleic Acid Molecules.
[8] Society of Toxicology. (2024). Handling and Disposal of Research-Grade Pharmaceutical Compounds. Toxicological Sciences, 198(1), 23-35.